Category Archives: vRA

vCAC Posts

Creating Dynamic Menus in vRA 7 using SQL

In a previous post I explained how to create a dynamic menu using a vRO action. That works great, if the values are going to be static, however you don’t really want to be editing a vRO action every time someone makes a change to the available options.

In this post I will show how to use a vRO action that returns the values (in this case “Department”) that are stored in an SQL Database. We’ll first create a vRO workflow to test we are getting the results we require, and then we’ll create the Action using the workflow code. Finally we’ll create a vRA 7 custom property and apply it to a blueprint so it can be selected at request time.

Pre-Requisites:

A deployed vRA 7 platform

An Instance of vRO that has been configured to orchestrate your vRA 7 platform (endpoint / server configuration / vRA Plugin)

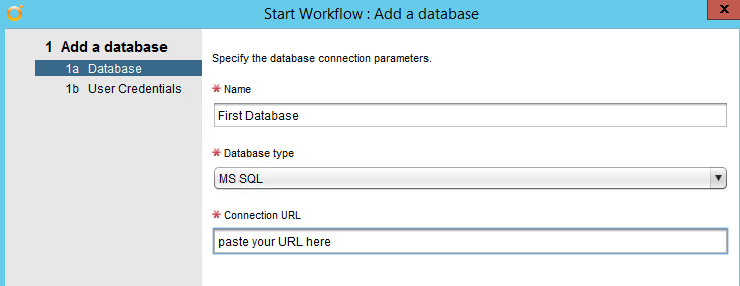
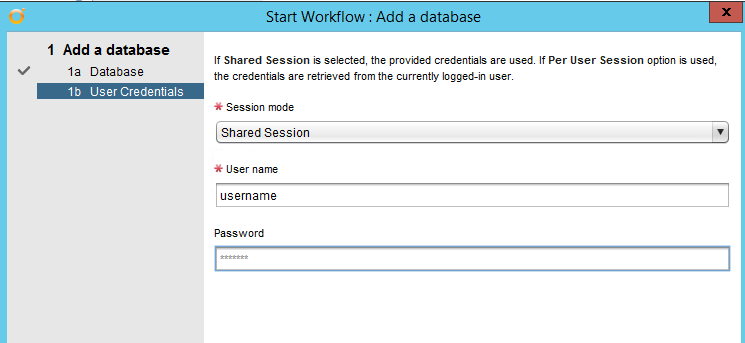
An SQL Database – That has been added to vRO – See this post for instructions on how to add an SQL DB to vRO
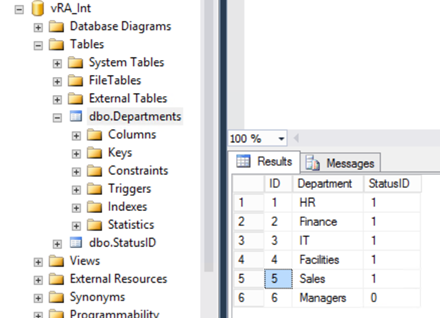
 

The Database

In my example, I have a SQL Database called vRA_Int, in that database I have a table called Departments with some values added:

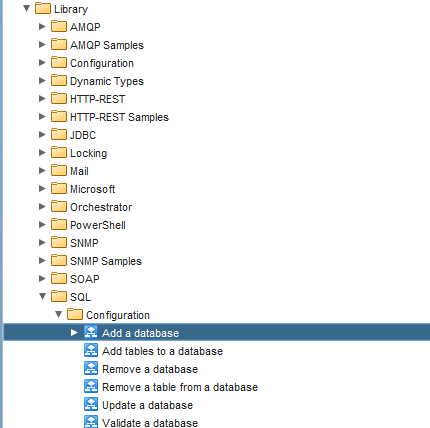
You can check you can explore the SQL Database from vRO by going to the Administer view in the vRO client, and expanding the SQL Plugin option:
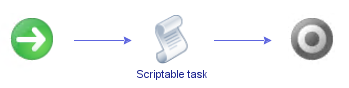
The vRO Workflow

So its time for the dreaded javascript piece, I’ll be honest, I am not a fan but I am learning and becoming much more comfortable with it now.

You’ll note from the workflow there are no Inputs or Outputs defined, I am just going to have the scriptable task define all of these:


Find the SQL Database

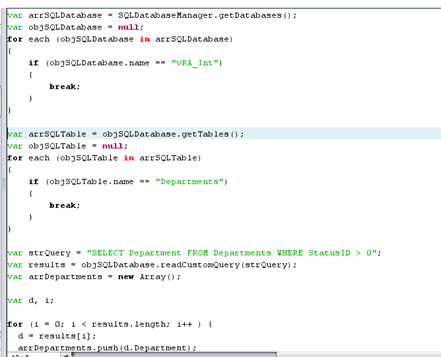
Next we need to define the SQL Database, you can use the vRO API Explorer to get the correct code required, it’s a bit clunky but once you get used to reading it things start becoming a little clearer:


var arrSQLDatabase = SQLDatabaseManager.getDatabases();

var objSQLDatabase = null;

for each (objSQLDatabase in arrSQLDatabase)

{

if (objSQLDatabase.name == "vRA_Int")

{

break;

}

}

Find the Required Table

We now need to define the table within the SQL Database:


var arrSQLTable = objSQLDatabase.getTables();

var objSQLTable = null;

for each (objSQLTable in arrSQLTable)

{

if (objSQLTable.name == "Departments")

{

break;

}

}

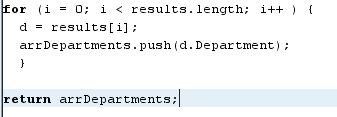
Define the SQL Query and return the results

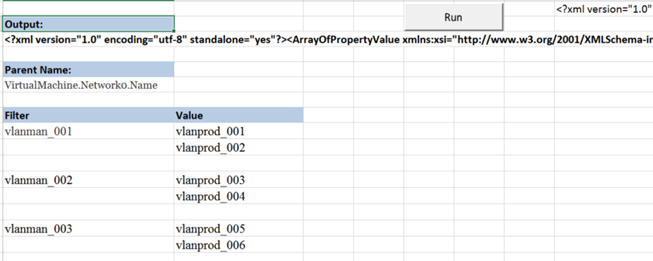
Here we define the query, and we loop through the table to return all of the results that match our query. We then return the results to the system log:


var strQuery = "SELECT Department FROM Departments WHERE StatusID > 0";

var results = objSQLDatabase.readCustomQuery(strQuery);

var arrDepartments = new Array();


for (var i = 0; i < results.length; i++ ) {

var d = results[i];

arrDepartments.push(d.Department);

}

System.log (arrDepartments)

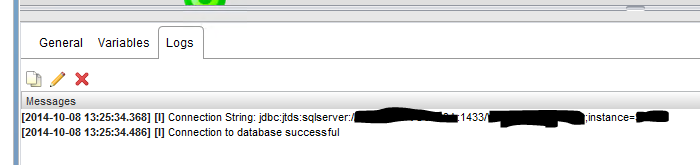
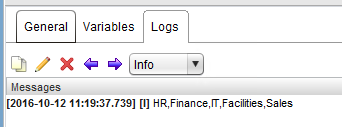
Save and Run the Workflow

You should now be able to run the workflow successfully, checking the Logs tab on the workflow history you should see the correct results returned:
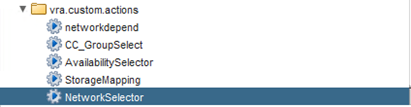
 

The vRO Action

Once you are happy that your workflow is working correctly and returning the expected results, you’ll need to create an Action for vRA to be able to return the values from a Request Form.

Create the Action

Create a new Action in vRO, and then copy and paste the code from your scriptable task.

Edit the Action Script

We’ll need to make a couple of small changes for the action.

First we need to remove the System.log line and replace with return arrDepartments;

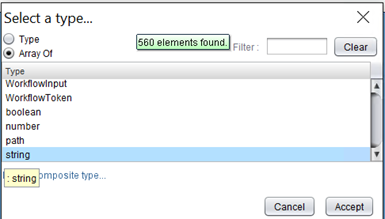
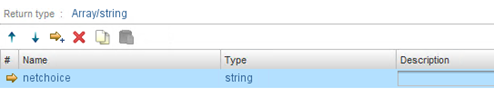
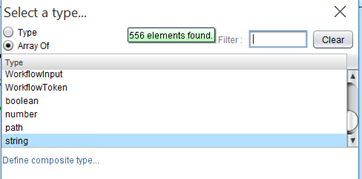
Second we need to define the Actions Return Type, this should be an Array of String:

And that should be all we need for the vRO action

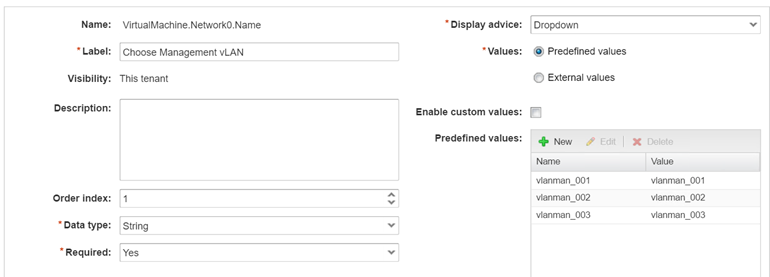
The vRA Property Definition

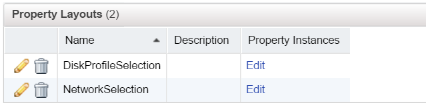
Now we need to create the vRA property definition, which will then be applied to a blueprint:


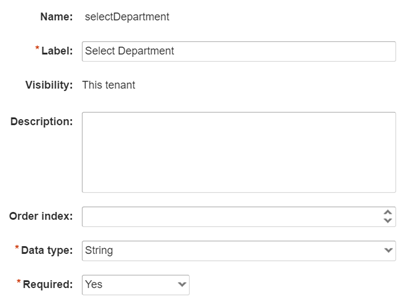
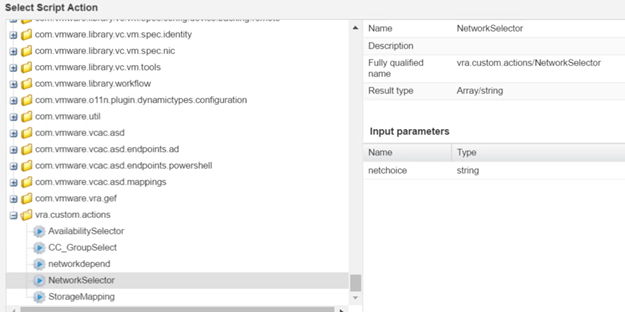
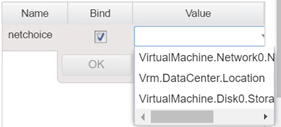
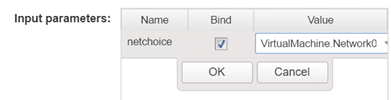
Now you need to select the action:

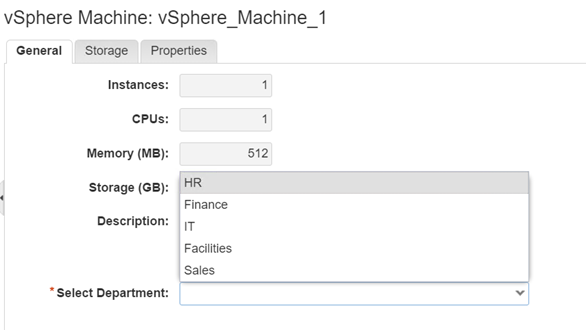
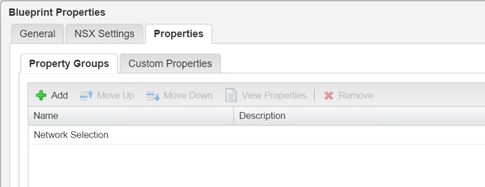
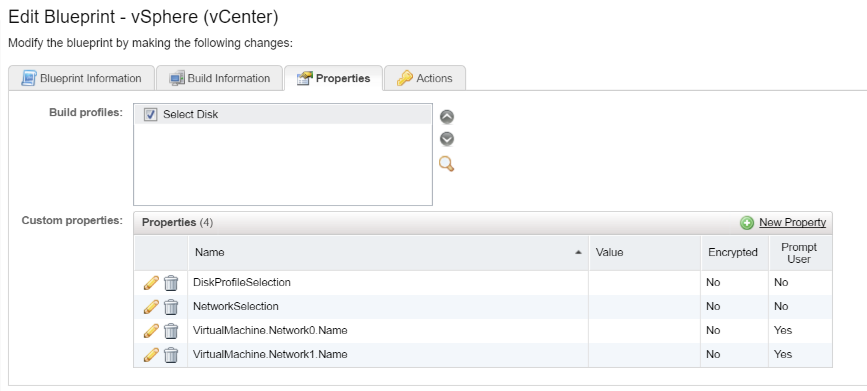
Once completed the Property Definition can be applied it to a Blueprint like below:

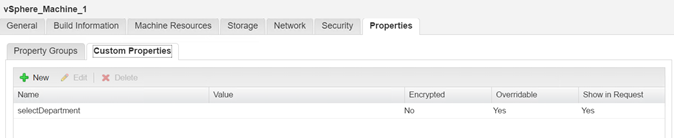
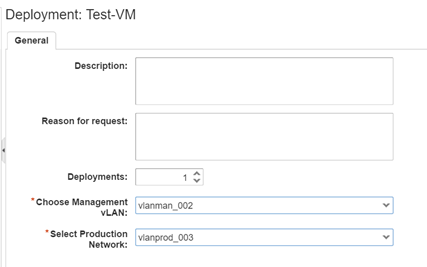
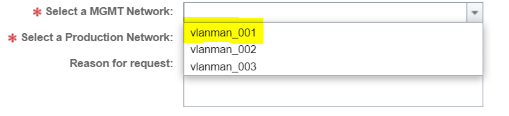
Make sure you select “Overridable” otherwise the dropdown will be blanked out

Voila….

Facebooktwittergoogle_pluslinkedinby feather

Property Relationships in vRA 7

In a previous post I described how to create a property relationship in vRA 6.2 using a value expression.

I thought I would attempt this using vRA 7 as the previous method is no longer valid. What we need to do now is create a vRO Action script to populate the vRA menu’s.

So to recap my requirements, I need to have a section on the request form that prompts users to select a management network for NIC0, and then depending on what the user selects they should be given specific options for NIC1, the table below shows the options.

Management vLAN (Primary NIC0) Production vLAN (Secondary NIC1)
vLANMAN_001 vLANPROD_001
vLANPROD_002
vLANMAN_002 vLANPROD_003
vLANPROD_004
vLANMAN_003 vLANPROD_005
vLANPROD_006


To get started we need to create our vRO action script, it’s at this point I must say a huge thanks to Simon Sparks from vcoflow.co.uk who showed me just how stupid I was being when trying this, and being pretty nice about it at the same time:

Open vRO client, select the Design view and then select the Actions tab:


You’re going to want to create a folder here for your custom actions, in my example I just used vra.custom.actions:

Create a new action and give it a name, for this example I have used “NetworkSelector”. Open the new action and go to the “Scripting” tab:

Change the Return Type to “Array of String”

Add a parameter I have just used netchoice for this example:

Now for the script area:


var arrOptions;
arrOptions = new Array();

if(netchoice)
{
switch(netchoice){
case "vlan_man001":
arrOptions.push("vlan_prod001");
arrOptions.push("vlan_prod002");
case "vlan_man002":
arrOptions.push("vlan_prod003");
arrOptions.push("vlan_prod004");
case "vlan_man003":
arrOptions.push("vlan_prod005");
arrOptions.push("vlan_prod006");
default:
arrOptions.push("");
}
}
else
{
arrOptions.push("");
}
return arrOptions


OK Save the vRO Action and go back to vRA. We now need to create the parent and child properties, we create the parent first:

  • Name: This is the custom property name that we are setting
  • Label: This is what appears on the request form
  • Order Index: This is the order the field will appear on the request form, as this is the parent we set this to 1
  • Data type – this is set to string
  • Display Advice: We need a dropdown for this example
  • Values: We predefine the values at this point, the values must match Network names

Save the property definition and then let create a new property definition for the child property:

First part of the property creation is pretty standard, I need to assign the correct order index here also:

For the values section choose Dropdown and then select “External Values” a box will appear where you can browse to your previously created vRO Action:

Now we need to bind the input parameter to the parent property:

Now we have both Property Definitions we need to create a property group assigning the two property definitions to the group:

Now you can assign the property group to your blueprint:

Now from the request form you can see the dropdowns with the appropriate options

Hope you find this helpful, and again massive thanks to Simon Sparks for his help with this, I am not a coder by any stretch and I’ll be studying javascript intensively over the next few weeks/months.


Facebooktwittergoogle_pluslinkedinby feather

Property Relationships in vRA 6.2

I had a requirement from a customer where they needed to give users the option to select which vLAN (port group) a secondary NIC would be placed on. To add a little bit of extra complexity, the options for the secondary NICs should change depending on where the primary NIC was placed……..are you with me still? Anyway looking around I found some great help out there mainly from Jad El-Zein’s fantastic blog post here and then this fantastic tool from Eiad Al-Aqqad blog and tool here Note: In vRA7 this method is no longer used, I have now uploaded a post on how to achieve this in vRA7. OK, for this example here are my requirements:

Management vLAN (Primary NIC) Production vLAN (Secondary NIC)
vLANMAN_001 vLANPROD_001vLANPROD_002
vLANMAN_002 vLANPROD_003vLANPROD_004
vLANMAN_003 vLANPROD_005vLANPROD_006

OK so first we need to create a parent value, in this case it will be the

VirtualMachine.Network0.Name property:

Edit the property attributes:

Now we need create the child values, for this example of the secondary NIC it will be the VirtualMachine.Network1.Name property:

Edit the property attributes: Create a relationship with the parent property:

Now we need to create a value expression, the relationship generator is invaluable here, it’s a great tool:


For the purists out there who like to write some code now and then the value expressions looks like this:

<PropertyValue><FilterName>VirtualMachine.Network0.Name</FilterName><FilterValue>vlanman_001</<br/>FilterValue><Value>vlanprod_001</Value>
</PropertyValue><PropertyValue><FilterName>VirtualMachine.Network0.Name</<br/>FilterName><FilterValue>vlanman_001</FilterValue>
<Value>vlanprod_002</Value></PropertyValue><PropertyValue><FilterName>VirtualMac<br/>hine.Network0.Name</FilterName>
<FilterValue>vlanman_002</FilterValue><Value>vlanprod_003</Value></<br/>PropertyValue><PropertyValue>
<FilterName>VirtualMachine.Network0.Name</FilterName><FilterValue>vlanman_002</<br/>FilterValue><Value>vlanprod_004</Value></PropertyValue>
<PropertyValue><FilterName>VirtualMachine.Network0.Name</<br/>FilterName><FilterValue>vlanman_003</FilterValue><Value>vlanprod_005</Value></PropertyValue>
<PropertyValue><FilterName>VirtualMachine.<br/>Network0.Name</FilterName><FilterValue>vlanman_003</FilterValue>
<Value>vlanprod_006</Value></PropertyValue></ArrayOfPropertyValue> 

Here is what your property should look like:

Next step is to create a Property Layout to make sure the properties display in the correct order on the request form NetworkSelection is the layout for this example:

The property instances should be as below:

Now we need to assign the custom property definitions and the property layout to the desired blueprint:

Now when we request a Catalog Item you should see the options on the request form:

Hope this is of some help to someone, if I need to achieve something similar with vRA7 I will post up the solution.

Facebooktwittergoogle_pluslinkedinby feather

Add Microsoft SQL Database to vRO

This has probably been covered in a million places, but if you want to add a database to vRO, to allow vRO to run modify the database as part of a workflow do the following:

First we are going to need a JDBC URL for the SQL Databse, luckily vRO comes with its very owm built in JDBC URL Generator workflow:

Open the vCO client à Library à JDBC à JDBC URL Generator and start the workflow


On the Next screen you should only enter a domain name if the user account you specified is an AD user, if you are using a SQL account leave the domain blank. This caught me out once.

Click Submit and when the workflow runs on the right hand will you see the JDBC URL in the logs

Copy this and then go to Library à SQL à Configuration à Add a database

Start the workflow and enter your details, paste the entire JDBC URL we created earlier, deleting what was already present.

Enter the credentials and Submit

You have now added a SQL Database that can edited via vRO.

Facebooktwittergoogle_pluslinkedinby feather

Publish vRO workflows in vRA Catalog

As a quick and easy run through I thought I would show how you can publish vRO workflows as a Catalog Item in vRA. This is a really basic workflow just to show an example of how vRA Advanced Service Designer can be used.

Couple of Pre-Reqs, make sure you are running vCloud Suite – Advanced edition as a minimum you do not get Advanced Service Designer in Standard!!!

OK, to get started you are going to need a workflow in vRealize Orchestrator, I have chosen the “Create an Organisational Unit” workflow that is included in the vRO AD Plugin. It’s a simple workflow that if you run it natively it only asks for 2 parameters an OU name and a Parent OU, since I don’t want my users to have to enter a parent OU, I am going to make some changes to the workflow to set the parent OU in advance.

First duplicate the workflow and save it in a folder where you keep all your customised workflows

Now lets edit the workflow to set the Parent OU value so the end users does not have to.

Edit the workflow and click on the Schema Tab

Select the createOrganizationalUnit element and edit it, click on the “IN” tab

Double click on the “container parameter”

Click on the “Not Set” value highlighted in the picture above and browse the domain to the parent OU where you want to place all created OUs

Click Select and then Click OK. If you select the “Validate” button from the Schema Tab the validation will run and should succeed (you may be prompted about an un-used parameter you are safe to remove this)

You can now run this workflow from vRO to make sure it runs successfully.

Ok so now you have your workflow, we now need to Publish this in vRA and grant permission to users so that people can see it in their Catalog, and run it.

Login to vRA and go to Advanced Service Designer à Service Blueprints à Add

Browse to the folder on vRO where the workflow you created earlier is located, highlight it and then click “Next”

Fill in the details for your workflow and then click “Next”

Then click “Next”

Then click “Next” again, we don’t need to make any changes

You’ll now have you Service Blueprint

Highlight the blueprint and click on “Publish”

As with all VM Blueprints you will need to assign a Service and Entitlements to the blueprint

Once done you should see the Service Blueprint in your catalog

Fill out the request info

Then enter the name of the OU you want

Click “Submit” and the request should process

That’s it for this demo, it’s a very simple way to show you how to get started with Advanced Services Designer, the more complex the vRO workflow the more complex it gets to publish, but I keep saying it vRA is a great product and really extensible.


Facebooktwittergoogle_pluslinkedinby feather