Category Archives: vRA

vCAC Posts

Add Active Directory Domain to vRO

Before you can start creating vRO workflows to manipulate and manage Active Directory, you’re going to need to add your domain to vRO, follow the below configuration steps to get started:

Open up the vRO client, ensure you are in “Design” view, then navigate to Library à Microsoft à Active Directory à Configuration

The workflow we are interested in at the moment is the “Configure Active Directory Server” workflow. Right click the workflow and select “Run Workflow”

Fill out the details pointing AD Host to either the hostname or IP address of a Domain Controller, then click “Next”

I created a service account in AD that has domain admin rights, I’ll use this account here to run this workflow, enter your username and password and then click on “Submit”

If the workflow runs successfully you will see in the vRO client

You can also change the vRO view to “Administer” and you can now browse the domain

You can now start to work with AD workflows for your domain

Facebooktwittergoogle_pluslinkedinby feather

Creating New Provisioned vCAC VMs in a specific OU with vCO

OK here is one I had some major issues with. I have to very kindly thank Gary over at http://extendingclouds.com for the help he gave me via a webex after dropping him a line on his blog (that was above and beyond). I also have to tip my hat to Sam at http://www.definit.co.uk/ who was a massive help when working with me, and pointed me in the direction I needed to go…because to be honest I didn’t have a clue!!!

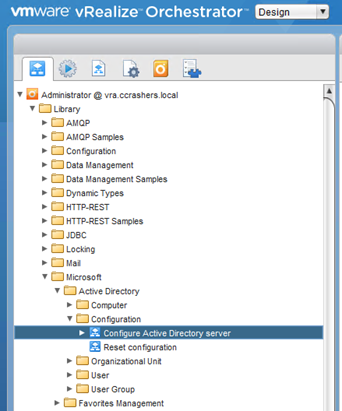
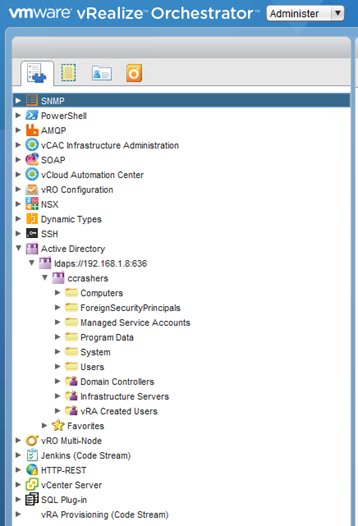
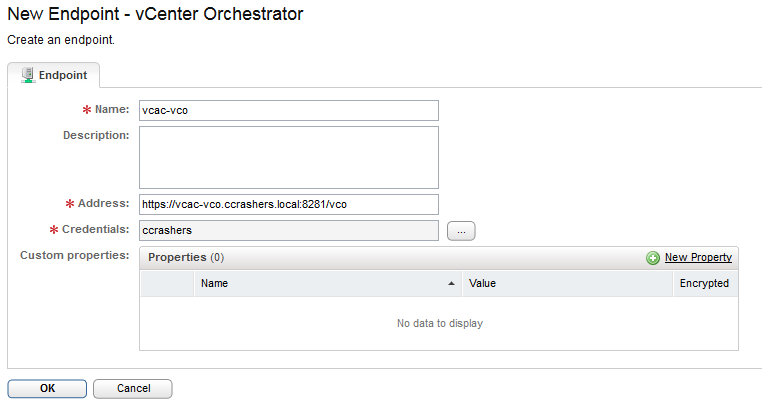
This guide assumes you have already ran the “Configure an Active Directory Server” in vCO and that you are able to browse your domain when you go to the Administer view, and select Active Directory.

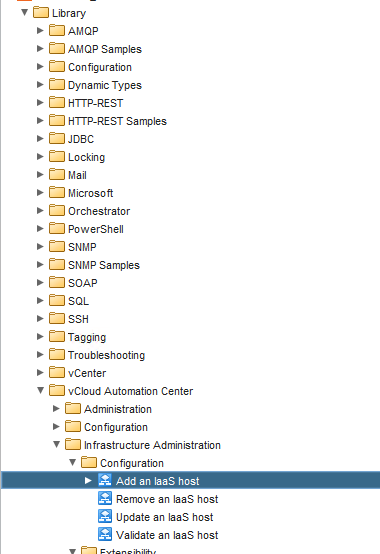
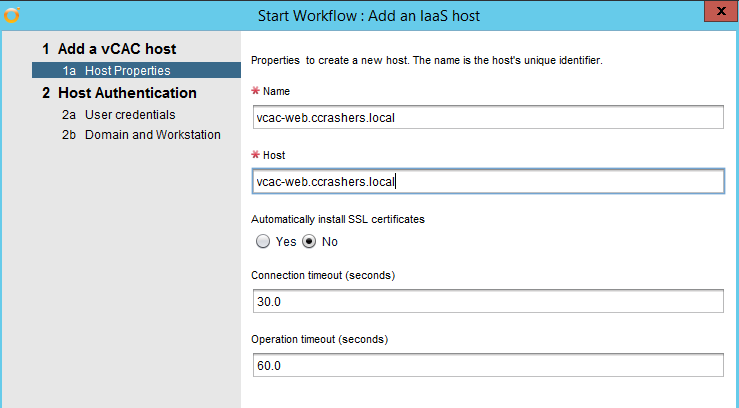
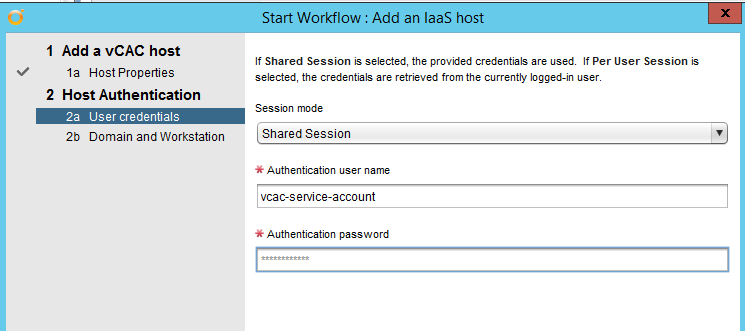
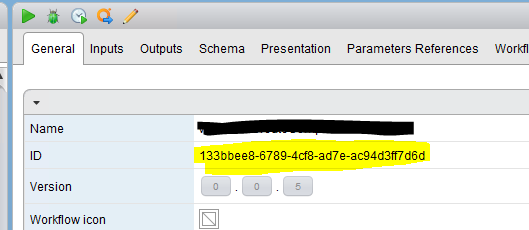
So firstly you are going to want to create a Workflow Template, use this step by step here from Gary http://extendingclouds.com/2014/03/08/utilizing-the-vcac-workflow-template/

You can test the Workflow Template is working by assigning the ID of the workflow to a Blueprint in Properties à Custom Properties

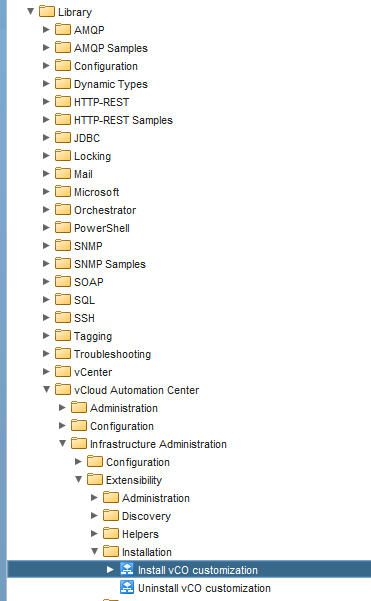
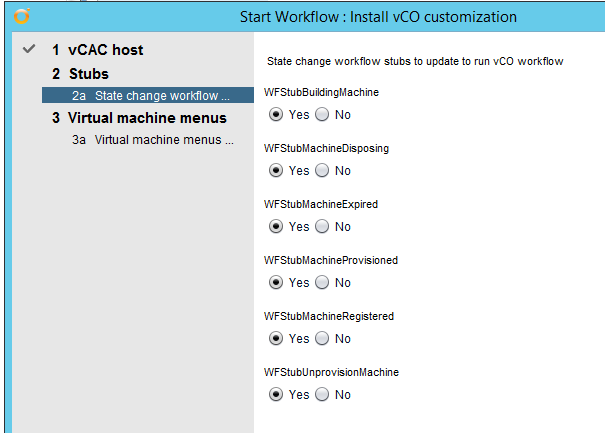
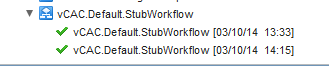
This workflow is going to run when we build a machine so this is why we add the workflow to ExternalWFStubs.BuildingMachine

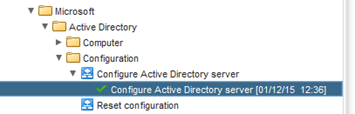
When you provision a machine now from this blueprint if you go into vCO you should see that the workflow has run:

If you then check the logs of the successfully ran workflow, you can see all of the properties that vCO has listed for the VM:

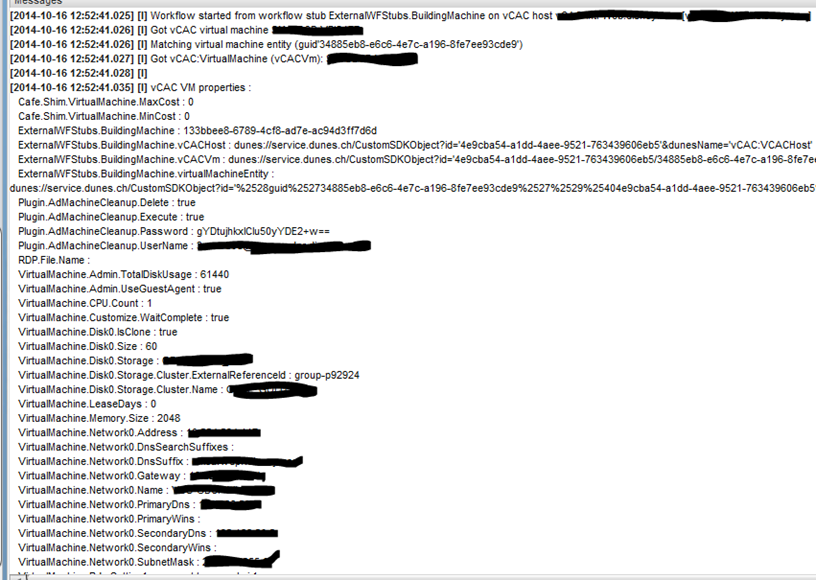
OK so that proves the Workflow Template is running and that you can pull out information required.

What I then did was Duplicate that workflow, and start to edit it so that I could pre-stage the VM to be a member of a specific OU:

Please note there may well be a much more efficient way to achieve this and I would be very happy to hear from someone with an idea, however my coding skills are pretty much non-existent, so this is how I go it to work.

On the newly create (duplicated) workflow click edit:

Give it a name. Then add 3 attributes:

Name            Type                    Value
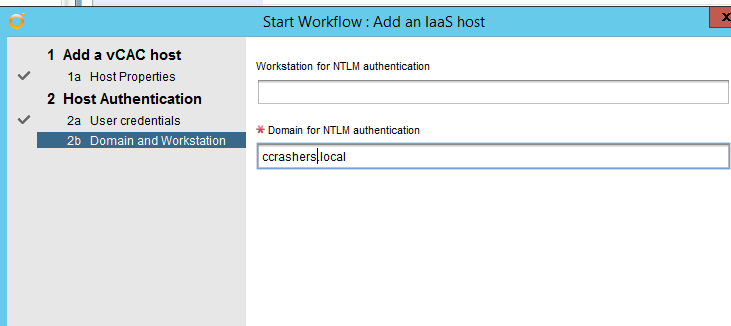
customOU         AD:OrganisationalUnit            Browse to the OU where you want the VM (please note this is why you must have previously added an AD Server)
machineName        string
domainName        string                    DC=ccrashers,DC=local

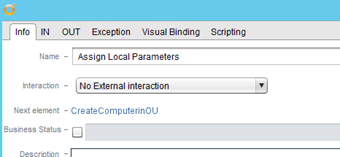
Then go to Schema and create a new Scriptable Task:

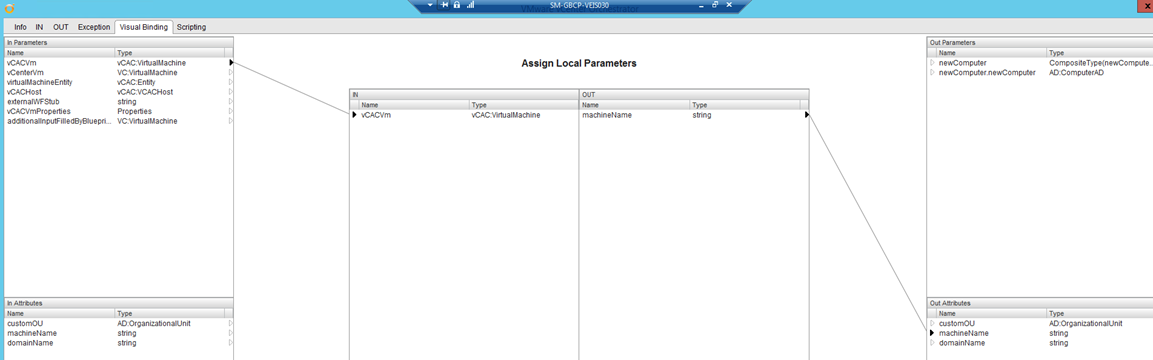
Assign Local Parameters

IN

Local Paramter: vCACVm
Source Parameter: vCACVm [in-parameter]
Type: vCAC:VirtualMachine
Description: vCAC Virtual Machine

OUT

Local Paramter: machineName
Source Parameter: machineName [attribute]
Type: string

Visual Binding

In Parameters                In        Out            Out Attribute
vCACVm vCAC:VirtualMachine    vCACVm    machineName        machineName

Scripting

machineName = vCACVm.virtualMachineName;


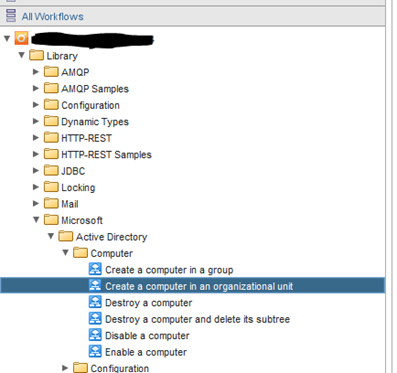
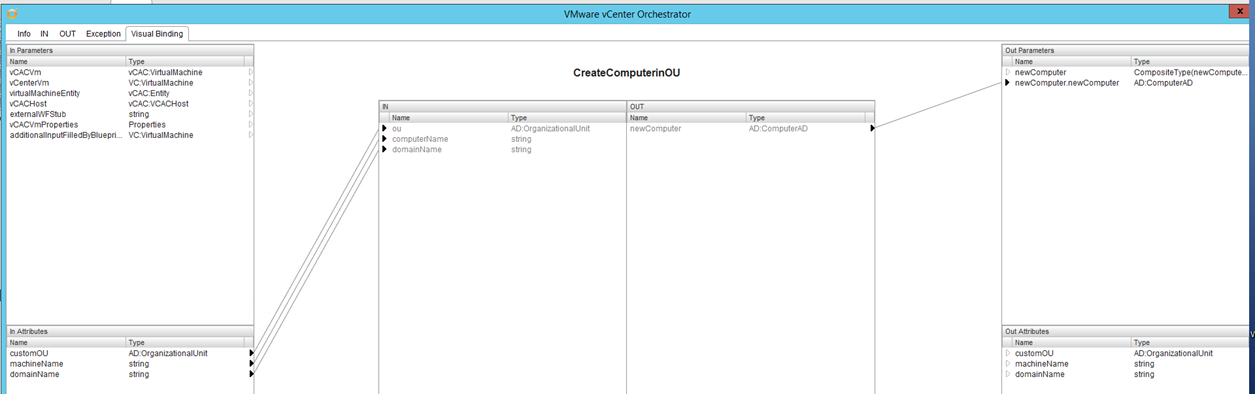
Now the scriptable task is complete I then call the built in workflow under all workflow:

IN

Local Parameter            Source Parameter            Type
ou                customOU [attribute]            AD:OrganizationalUnit
computerName        machineName [attribute]        string
domainName            domainName [attribute]        string

OUT

Local Parameter            Source Parameter                    Type
newCOmputer                newComputer.newComputer[out-parameter]        AD:ComputerAD

Visual Binding

In Attributes                    In            Out                    Out Parameters
customOU    AD:OrganizationalUnit        ou            newCOmputer AD:ComputerAD    newComputer.newComputer
machineName    string                computerName
domainName    string                domainName

Now when I assign this workflow to a blueprint, the new VM is provisioning and a computer account is create in an OU call vCAC Servers on my domain.

Please if anyone knows a better way to do this or has any questions drop me a line, I got through this with lots of help from others so if I can help someone else then all the better.

Good bye for now.

Dean

Facebooktwittergoogle_pluslinkedinby feather

Prepare vCO and vCAC 6.1 for Workflow creation

OK so now you have deployed your vCAC 6.1 Architecture including vCAC 6.1 Appliances, Identity Appliance, IaaS Servers, vCO configuration, Tenant Configuration, you’re going to want to start running and creating some workflows.

There are some task that need to be completed before we can get started.

  • Create a vCO Endpoint in vCAC 6.1
  • Add an Iaas Host
  • Install vCO Customization

So lets get started:

Create a vCO Endpoint in vCAC 6.1

Infrastructure Tab à Endpoints à New Endpoint à Orchestration à vCenter Orchestrator

Give the Endpoint a Name, Description, and set Credentials.

The address need to be in this format: https://vcoservername.domain.local:8281/vco if you have created a load balanced vCO deployment enter the Load Balanced FQDN.

And that should be that.

Add an IaaS Host

Go to your vCO Client
Library à vCloud Automation Center à Infrastructure Administration à Configuration à Add an Iaas host

Run the workflow

Enter the name of your IaaS host and the fqdn of the host remember if you are using a distributed IaaS config enter the Load Balanced name.

Enter credentials do not prefix with a domain name.

Now enter the AD domain

Then hit Submit and a lovely Green tick should appear once it has run successfully:


Install vCO Customization

Whilst still in the vCO client
Library à vCloud Automation Center à Infrastructure Administration à Extensibility àInstallation

Run the workflow à Click on the Not Set field:

Select you IaaS host from the dropdown:

Click next and select all options:

Click next and then Submit:


You are now ready to create workflows for vCO workflows for vCAC 6.1

Facebooktwittergoogle_pluslinkedinby feather

Distributed vCAC 6.1 using F5 Load Balancers Notes Part 2

F5 vCAC 6.1 IaaS Configuration

OK next I will configure the Load Balancers for the IaaS Components unfortunately I had some issues with this particular part when I was trying to actually perform the IaaS install. I was seeing entries in the Install log like below:

System.Data.Services.Client.DataServiceTransportException: The operation has timed out —> System.Net.WebException: The operation has timed out
at DynamicOps.Tools.Repoutil.Commands.AssemblySqlInstallCommand.Execute

(CommandLineParser parser)
Warning: Non-zero return code. Command failed.
Done Building Project “C:\Program Files (x86)\VMware\vCAC\Server\Model Manager Data\DeployRepository.xml” (InstallRepoModel target(s)) — FAILED.
Build FAILED.


So here are the details:

IaaS Server 1: vcac-web-01.ccrashers.local – 192.168.20.3
IaaS Server 2: vcac-web-02.ccrashers.local – 192.168.20.4
Load Balancer VIP: vcac-iaas.ccrashers.local – 192.168.30.2

F5 Pool Configuration:

Name: vcacp-iaas-pool
Members:
vcac-web-01.ccrashers.local on All Ports; vcac-web-02.ccrashers.local on All Ports.

Health Monitor: I have just used a basic ICMP Monitor
Load Balanced Method: Least Connections

F5 Virtual Server Configuration

OK so I’d like to point out here that I “cheated” a little. As opposed to creating a Virtual Server per each Port/Service I decided to create one Virtual Server for all ports. I don’t use the F5 for any security functions, it is only used to balance traffic so it works for me, again this is the configuration that worked for me, you may need to change this for your platform.

Name: vcac-IaaS-web-VS
Type: Performance (Layer 4)
Source: 0.0.0.0/0
Destination: 192.168.30.2
Service Port: 0 (All Ports)

Source Address Translation: SNAT
SNAT Pool: vCAC_SNAT
Address Translation: Enabled
Source Port: Preserve

Default Pool: vcacp-iaas-pool
Default Persistence: source_ip

Facebooktwittergoogle_pluslinkedinby feather

Distributed vCAC 6.1 using F5 Load Balancers Notes Part 1

Hi, I have recently deployed a fully distributed vCAC 6.1 platform. I used F5 LTMs as load balancers. I had quite a few issues when installing the IaaS Servers to the Load Balanced name and I thought I would share my experiences to help anyone out there who may have the same issues.

First off read this page: vCAC Load Balancer Requirements

Its important you action these requirements especially the disable the:
Microsoft Loopback protection must be disabled on the IaaS Servers otherwise you will get some odd errors if you don’t do this.

If you are using F5’s you know how customisable they are, I’ll note down how I have configured my F5’s but there is more than likely a different solution available to you:

F5 vCAC 6.1 Appliance Configuration

I’ll start with the vCAC Appliance Configuration as this one is pretty standard:

vCAC Appliance 1 – vcac-app-01.ccrashers.local – 192.168.20.1
vCAC Appliance 2 – vcac-app-02.ccrashers.local – 192.168.20.2
Load Balancer VIP – vcloud.ccrashers.local – 192.168.30.1

F5 Pool Configuration:

Name: vcacp-app-pool
Members: vcac-app-01.ccrashers.local on All Ports; vcac-app-02.ccrashers.local on All Ports.


Health Monitor: I have just used a basic ICMP Monitor
Load Balanced Method: Least Connections

F5 Virtual Server Configuration 1

Name: vcac-app-443-VS (note I am using SSL pass through)
Type: Standard
Source: 0.0.0.0/0
Destination: 192.168.30.1
Service Port: 443

Source Address Translation: Automap
Address Translation: Enabled
Source Port: Preserve

Default Pool: vcacp-app-pool
Default Persistence: source_ip

F5 Virtual Server Configuration 2

Name: vcac-app-80-VS (note I am using SSL pass through)
Type: Standard
Source: 0.0.0.0/0
Destination: 192.168.30.1
Service Port: 80

Source Address Translation: Automap
Address Translation: Enabled
Source Port: Preserve

Default Pool: vcacp-app-pool
Default Persistence: source_ip

F5 Virtual Server Configuration 3

Name: vcac-app-5480-VS (note I am using SSL pass through)
Type: Standard
Source: 0.0.0.0/0
Destination: 192.168.30.1
Service Port: 5480

Source Address Translation: Automap
Address Translation: Enabled
Source Port: Preserve

Default Pool: vcacp-app-pool
Default Persistence: source_ip


Facebooktwittergoogle_pluslinkedinby feather